Pre-Production: Equipment Research

Given circumstances outside of our control we were unable to fully record and edit our short films. This has made me believe that my sister’s Canon branded camera should be sufficient for taking photographs of the storyboards. The model is the Canon 4000D. This camera comes with full HD quality, approximately 18 pixels and a built-in flash mode. However, it does not come with a stand to position it on while taking photos for my storyboards. Despite this, I feel that this is an appropriate camera to use for this process as it is a good starting point for professional photography at colleges.

As most of my shots will be taken close to subjects, I have decided to use the 18-55 millimetre lens for the storyboards. Along with this, I had the idea to use a drone with a camera attached to it for the final shot of the short film as it pushes in on the subject in the scene. However, due to a combination of reasons – global circumstances and the fact that I do not own such equipment personally – this idea was just a hypothetical possibility as I believe I can still achieve a similar result in storyboard film by simply standing over the actor in question.

As a result of our inability to film my complete project, I felt that making a decision on what sound equipment I should use would be unnecessary as recording any form of audio would be impossible and pointless under current circumstances. Despite this, I planned to use a voice recorder app on my phone that is installed on the device by default. The last time I recorded footage for a short film, I did not use any form of voice recording other than keeping the audio from my phone that I used to capture the footage and with hindsight, I see that this decision led to a decrease in the quality of the short film.

If I were able to film footage, I would use Final Cut Pro in order to edit the footage together in the post production stage of developing my short film given the amount of success I have had with it while working on previous projects. Along with this, I will use a San Disk Ultra memory card to capture the images for my storyboard as it can hold 16 Gigabytes of data and works at 80 megabytes per second.

Pre-Production: New Treatment

Betrayal of Trust (Version 3).

The film opens on a shot in a living room as a teenager/young adult called Mike as he is shown to be scrolling through Google on his phone. While he does this, he receives a text message from an anonymous person which contains images showing his cousin John and his girlfriend Kat clearly in a relationship with the images showing them hugging and kissing each other. As an immediate response, he checks his phone and sees on a location based app that Kat is at John’s house. After this, he picks up a coat and begins to run towards John’s house.

There is then a cut to John’s house as he and Kat are huddled together watching a film. They hear someone approaching and John looks out the window where he sees Mike approaching. He tells Kat to hide in another room and says he will attempt to defuse the situation. John then opens the door to Mike who pushes him aside as he storms in and immediately accuses him about Kat. John sits him down at the kitchen table and starts making drinks for both as they attempt discuss it but the two quickly escalate into an argument. John taunts Mike about how Kat prefers him and how he’ll take her away from Mike with Mike begging for him not to. Having overheard the entire conversation from her hiding place, Kat slips out the window and starts to run down the road.

Clutching at his chest, John starts having an asthma attack and tries to shout for his inhaler. Mike spots an inhaler on the side table on the other side of the room and grabs it under the assumption that it is John’s. He then taunts John back in retaliation for his previous actions and saying that he will know how it feels like to have something important taken away from him. John begins to mouth “No” and pointing to a drawer while trying to gain enough breath to say “in there” as he gasps for air. Mike simply ignores him out of malice and says that he can’t understand him while continuing to hold the inhaler out of John’s reach. John eventually collapses to the floor.

Kat is still running down the road but soon slows down out of breath as she too has an asthma attack and frantically starts checking her pockets in a panic. She then looks back at John’s house in distress. Meanwhile, Mike checks on John and who is no longer breathing. Mike kneels down and says to John “Now you’ll never take her”. He looks at the inhaler he has been holding as John was suffering from his asthma attack and sees that it has Kat’s name on it. Puzzled, he steps towards the drawer John was pointing at and opens it only to see another inhaler inside with John’s name on it. This causes Mike to panic as his eyes shift from one inhaler to the other. He takes a final look back at John’s body before he drops Kat’s inhaler and sprints out. The scene fades to a bird’s eye view shot of Kat as she lies with her still eyes open but her body lifeless on the side of the road.

Pre-Production: An Idea Change

After a long time of consideration and discussion with others, I decided to modify my idea to add more realism to it. In this new idea, the primary location and number of main characters along with their names (Mike, John and Kat) would remain the same and I would not need to find many more props that wouldn’t have been present in the original versions. However, instead of being friends, John and Mike would be cousins that dislike each other. Kat’s involvement in the story would remain mostly the same with Mike being in a relationship with her until he discovers that she is cheating on him with John. The beginning of the argument would be very similar to the original version but it would end with John and Kat both suffering from an illness with Mike watching on as the former becomes helpless to do anything and collapses from an asthma attack.

Pre-Production: Lighting Research

One of the most important aspects of a film is lighting. As a result, there are many separate techniques used across film. The main 13 techniques are Natural, Key, High Key, Low Key, Fill, Back, Practical, Hard, Soft, Bounce, Side, Motivated and Ambient light. Natural lighting is the standard style of lighting as it involves no alteration to the way the existing location is illuminated and is most often used to portray real life.

Key lighting is used to highlight a specific subject whether it’s an actor or an object. This can also be split into high and low key lighting with high key increasing the intensity of the camera’s brightness in order to remove shadows from a shot whereas low key emphasises shadows.

Fill lighting is often used in order to balance out the shadows created by the use of key lighting. This is achieved through placing it opposite to the position of the source for the key light and with the intensity of the fill light being lower than the key light’s intensity.

Back lighting is another technique that is combined with key lighting to keep the subject separated from the background which forms a sense of perspective and shape. Unlike the others, the light source is placed behind the actor or object that the key and fill lights are focused on. Along with this, it is often positioned above the subject.

Practical lighting is most commonly associated with long lasting shots (such as camera pans) and wide shots. The source of practical lights originate from light sources on screen such as regular lamps or fire related lights. This is done as a way to naturally incorporate elements of the set’s props.

Hard lighting is created through a single harsh beam of light from a directed source in order to create more shadows. Occasionally, it is used to create silhouettes of the actors or draw attention to a specific place in the shot. In contrast, soft lighting is an aesthetic choice to remove shadows and smooth out an actor’s face to make them appear younger to the audience.

Bounce lighting is made by using a large white card or board to reflect light evenly across the scene. This technique can be utilised in order to create various other forms of lighting such as any of the 3 point lighting positions (key, fill and back lighting) depending on its positioning.

Side lighting (also referred to as chiaroscuro lighting) is positioned to be projected from a specific angle of the set to highlight a subject. Regularly used in film noir, side lighting heavily contrasts the contours on the subject and is often required to be managed and moderated with the use of bounce lighting.

Motivated lighting is implemented to replicate a natural source of light such as from the sun. In most cases, this is used in conjunction with practical lighting and natural lighting along with utilising tools such as gels or camera filters to more accurately form them into the type of light they are replicating.

Ambient lighting seeps into a scene through small amounts of natural light slipping through to any location that is used in a film. Due to being from sources that can’t be controlled by film crews, amounts of ambient lighting naturally changes based on factors such as weather or the time of day which causes film crews to consider how this would effect an extended sequence. The effects that ambient light have also display the necessity of location scouting.

Pre-Production: Story-boarding Conventions

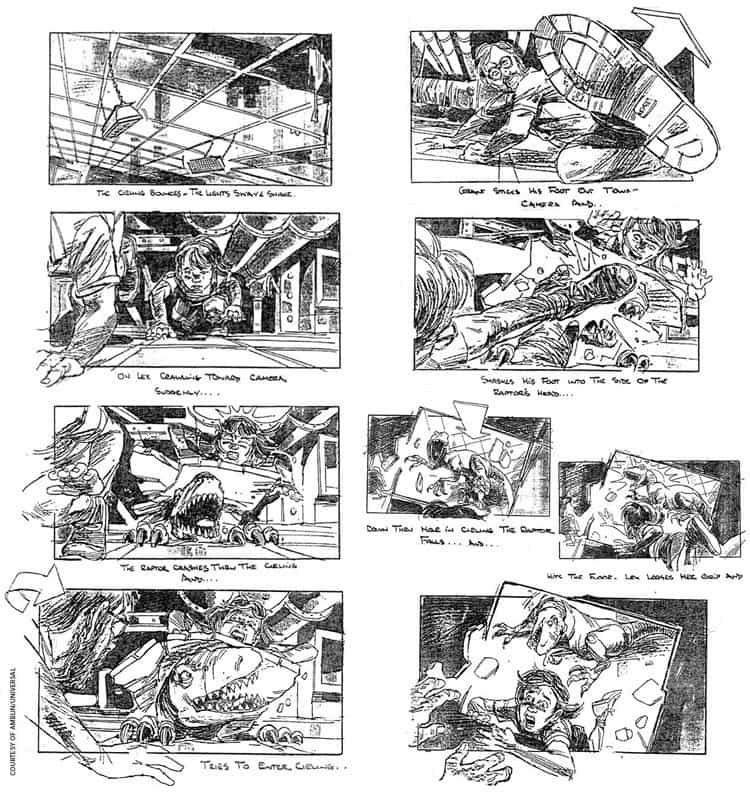
In film, storyboards are used to layout the structure of a scene with each image representing a single camera shot. This is done as a way to demonstrate to those working on the film how a scene is intended to play out in the final product.

Storyboard Examples - Storyboard Ideas - Film Storyboad Template - Storyboard Format -Jurassic Park Storyboard - StudioBinder
A Storyboard from a scene in Jurassic Park (Steven Spielberg, 1993).

Individual filmmakers are able to decide how much information they want to include in their film’s storyboards based on how much control they want. Despite this, most storyboards include notes on camera movements and angles (such as the camera panning into a low shot), the scene’s location, general descriptions of actions in each shot and where each shot would take place. In order to show movement of the camera, arrows are used to show the direction it moves in through uses such as an arrow left or right to display a panning motion and an arrow in each corner symbolises a camera pushing in or out in a shot.

Pre-Production: Script Conventions

The most obvious start point for any script is the title. A title’s intended format within a screenplay is to have it centred on the page with the name of the scriptwriter (and any co-writers) directly below it. There is also an additional use of “based on the book…” if it has been adapted from another source into the screenplay.

In order to denote changes in location, scripts utilise Sluglines which consist of three core elements. Firstly, it displays whether a scene takes place in an interior (INT) or exterior (EXT) location, followed by the location itself and ends with a general timeframe such as “Morning” or “Evening”. This indication of time is used more for the benefit of lighting crews in order to describe how to display the scene in question.

Immediately after the Slugline, the initial action of a scene is implemented with any other actions being displayed at any point where they would take place between lines of dialogue. Along with describing the actions themselves, lines of action in a script are used to give a basic explanation of what mise-en-scène based items are in the scene so that the set designers have a starting point on what to create or find to fill the set with. In order to highlight key elements of the scene – such as character appearance, diegetic/non diegetic sounds and specific props – the words in question are often fully in upper case to contrast to the rest of the excerpt.

Dialogue is laid out with the name of the speaking character in upper case for similar reasons to highlighting certain parts of the staging. Along with this, the character name is sometimes followed by an indicator for if they are speaking as part of a voice over (labelled as V.O.) or if they are off screen (labelled as O.S.) for part of a scene. The dialogue itself is placed directly under the character’s name in a centred alignment on the page. If there is a section of dialogue intended to be shouted then it is displayed in bold to signify this alteration in speech and performance.

Finally, parentheticals are used in order to denote additional actions that the performers are required to know and are often placed in brackets under character names or dialogue (depending on where the action is meant to occur). Examples include how they appear to others or turning during a conversation.

Pre-Production: Action Points and Preparation Possibilities

In preparation for my production, I would need to rewrite the story a second time – although not as drastically as my first rewrite- to address the criticisms I received in a discussion after my pitch. This rewrite will help add more realism to the short film. I’d need to also learn about how people react to finding about their partner having an affair to build upon the specific reactions of characters within the film. In order to film the storyboards, I will need to borrow my sister’s camera to improve the quality of the photos taken. I will ask some of my friends if they wish to appear as the ‘cast’ of the short film within the storyboard photos. Along with this, I need to make various rooms tidy enough to use within the filming process.

Pre-Production: Reflections on Pitch

After discussions with our film studies teacher, I have decided to heavily change the main story of my idea. When looking back on my initial idea, I realise that it was too focused on action and comedy with it being pointed out to me that a comedic focus would be very difficult to pull off along with how it seemed to be very derivative of one of the short films we watched.

After pitching the modified version of my idea, it was pointed out that the actions of the characters seemed to be overly dramatic and that the ending should be changed to be more realistic in the finalised version instead of the character dramatically killing himself at the end of the short film. I think the reason I received those suggestions is because I had previously only written ideas for performances in Drama which often used more absurdist and unrealistic elements which led to me remaining within that mindset while coming up with my plot. I also need to work out how much dialogue to place into the script as I now feel I was too vague on that point during my pitch.